Source illustrationAbout this image
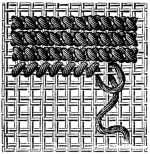
Source illustration, figure 253, showing the two-pass cross stitch.Historical guide · Modern adaptation
Counted cross stitch
Practice counted cross stitch in two passes, following Dillmont’s illustrated stitch lesson.
Before you begin
Materials
- Even-weave fabric or counted embroidery cloth
- Embroidery floss or cotton suitable for the fabric
- Blunt embroidery needle
- Embroidery hoop if helpful
- Scissors
One step at a time
Step-by-step instructions
- 1
Prepare a counted area
Use a fabric with visible, even squares. Mark a small rectangle of about 10 by 10 fabric squares with removable thread or a washable marker tested on a scrap. This practice size is a modern choice; the source gives a stitch lesson, not a project size.
- 2
Thread the needle
Cut a comfortable length of thread and secure it on the back without a bulky knot. Keep the fabric steady in a hoop if that helps you count.
- 3
Make the first diagonal pass
Work a row of diagonal stitches across the counted squares in one direction. Keep each stitch in the same orientation and cross the fabric at the same set of threads each time.
- 4
Cross the row
Return across the row, making the opposite diagonal over each first stitch. Each square should show a neat X with its four points meeting at the corners.
- 5
Check the back and finish
Turn the work over and check that the thread lies flat without long loose loops. Secure the end under several stitches and trim it. Wash only if the fabric and thread labels allow it.
Modern adaptation. Check materials, measurements, and gauge before beginning.
Historical guide · Modern adaptation
From Encyclopedia of Needlework
Original heading: Cross stitch · “Tapestry and Linen Embroidery,” “Cross stitch,” fig. 253
Read the original wording and adaptation notes
Original wording
Cross stitch (fig. 253 ).—Cross stitch is the foundation of every other stitch, and the one in most common use. It is also called marking-stitch, being used for marking linen. It is worked in two lines. In the first, the thread is carried diagonally from left to right across a square of threads, and then, downwards, underneath the two horizontal threads; in the second, the stitches are carried from the right-hand lower corner of the square to the upper left-hand corner, so that the four points of the two stitches form a perfect square.
What changed for this modern edition
- This entry teaches the historical stitch method with a small modern practice area. The source does not supply a new chart or a finished object pattern.
- Fabric, thread, and hoop are modern practical choices. The practice guide has not been sample-stitched.
View the original source illustration
Public domain in the USA. Rights status can differ outside the United States.
View the digitized book at Project GutenbergThis Project Gutenberg source identifies itself as an English edition but gives no publication year. No year is inferred here.
Maker notes
Your shelf
Sign in to save projects across devices and share your making.
Finished projects
No makers have shared a finished version yet.
Questions and notes
No comments yet. You can be the first to share a useful note.