Source illustrationAbout this image
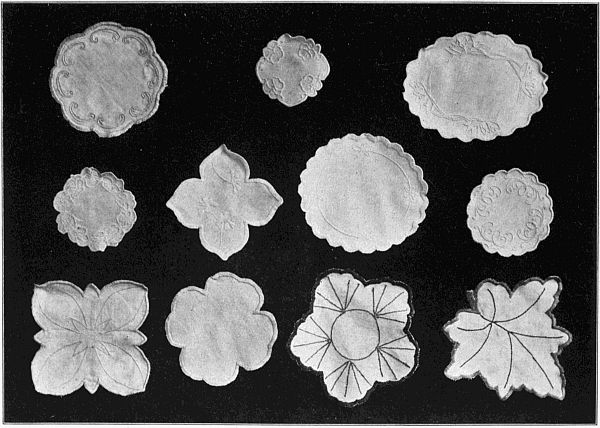
Eleven historical student designs reproduced in the source. They are examples for study; this lesson asks you to create and choose your own outline.Historical guide · Modern adaptation
Design your own embroidered doily
Plan a balanced outline on folded paper, transfer it to cloth, then finish the edge and decorate the design with two stitches.
Before you begin
Materials
- Imitation butcher’s linen or another stable woven cloth, 9 × 9 in
- White or contrasting embroidery thread
- Embroidery needle
- Paper squares, about 8 × 8 in, for practice designs
- Tracing pencil or transfer paper
- Scissors, ruler, and pins
Quick reference
Abbreviations
- Blanket stitch
- An edging stitch that makes a looped line along a raw edge.
- Kensington outline stitch
- A line stitch used to follow the outline of a design.
One step at a time
Step-by-step instructions
- 1
Prepare the cloth and paper
Set aside a 9-inch square of woven cloth. Cut 10 to 12 practice papers about 8 inches square, following the source’s exercise. The source names imitation butcher’s linen, white luster cotton, and a No. 5 needle; modern materials may behave differently.
- 2
Fold and cut practice shapes
Fold one paper three times. Cut a curve from corner to corner, using a convex, concave, or compound line. Open it and study the outline. Repeat with corrections, then try a straight-line design and one that combines straight and curved lines.
- 3
Choose a balanced outline
Compare the paper shapes and choose one that looks even and pleasing. The source recommends rejecting awkward options instead of choosing the first cut. Add only a little decoration; plan lines that relate to the outline.
- 4
Transfer the finished design
Before embroidering, finish the paper pattern. Pin it to the cloth and trace the outline and interior lines, or use transfer paper and a hard pencil. Test the marking method on a scrap first.
- 5
Work the interior lines
Use Kensington outline stitch on the transferred decoration. To start, begin about ½ inch before the line and make three or four small running stitches. Turn the cloth so you can work away from you. Point the needle toward you and take short running stitches directly on the line, keeping the thread to the right of the needle except on a sharp curve to the left. Use shorter stitches on curves.
- 6
Stitch the edge before cutting
Follow the traced doily outline with blanket stitch while the cloth is still whole. Work from left to right. To start, take one or two running stitches from the chosen stitch depth to the cloth edge. Make the first blanket stitch over them. For each next stitch, insert the needle at the same depth, bring it out over the thread, and draw the loop to the edge. Keep stitches close enough for their threads to touch and make a firm edge.
- 7
Cut and finish the edge
Cut just outside the blanket stitches. For a narrow turned finish, turn the raw edge to the wrong side and whip it down. The source also allows a fine blanket stitch just over the cut edge. Work carefully around curves and do not clip the blanket-stitch loops.
- 8
Secure and press
Fasten the threads on the wrong side with several small backstitches through one layer. Press from the reverse side over a soft towel if the cloth and thread allow it.
Modern adaptation. Check materials, measurements, and gauge before beginning.
Historical guide · Modern adaptation
From Handicraft for Girls
Original heading: A Doily—Blanket Stitch and the Kensington Outline Stitch · Chapter III, “A Doily—Blanket Stitch and the Kensington Outline Stitch,” Exercise No. 16, printed pp. 24–26
Read the original wording and adaptation notes
Original wording
Materials: Imitation Butchers' Linen 9" × 9"; white luster cotton; needle No. 5. An exercise in paper cutting for the doily design. Have pupils provide themselves with ten or twelve pieces of paper eight inches square for practice cutting. Fold the first paper three times and cut a convex, concave or compound curve from corner to corner. Open and study these curved lines and select the most graceful. Cut again making corrections. Cut a design in straight lines. Cut one composed of both straight and curved lines. Do not work haphazard, but criticise, compare and reject. The surface requires little decoration if the doily is pleasing in outline. That which is placed upon it should have some relation to the outline. Study the space to be decorated and how it can be divided or ornamented by lines, curved or straight, that may serve as a real decoration, but avoid too elaborate designs. Before beginning the doily have a finished pattern. The pattern may be transferred to the cloth by tracing the pattern with a hard pencil, using carbon paper between pattern and cloth, or the pattern may be pinned on and the outline drawn and the design put on freehand. To work the Doily. Finish the edge with the blanket stitch. See "Blanket Stitch," page 73. Work the lines of the design with the Kensington Outline Stitch. Blanket Stitch. —The blanket stitch, often erroneously called the buttonhole stitch, is used for finishing raw edges. It is worked from left to right, and the buttonhole stitch from right to left. A. To Finish the Edge of Flannel or Heavy Cloth: Insert the needle at a point the desired depth of the blanket stitch and take one or two running stitches to the edge of the cloth, which will bring the thread in position for the first stitch. Make the first blanket stitch over these running stitches. Holding the edge of the cloth toward you insert the needle at the same point as before and bring the needle out over the thread and draw the loop thus made to the edge of the cloth. Repeat for successive stitches. B. For Embroidering an Edge—Straight, Scalloped or Irregular. The stitches are the same as in "A" but should be placed close enough together so that the threads touch, making a firm edge. The embroidery should be done before the edge is cut. It can then be finished in various ways. The narrow edge can be turned back and whipped down on the wrong side, or blanket stitched just over the edge with fine cotton thread. Kensington Outline Stitch. —This stitch is used to follow the line of a design for ornamentation. To avoid the knot, when starting begin half an inch from the end of the line to be followed, and put in three or four running stitches, bringing the thread out at the proper place for starting. Turn the cloth around, holding it over the left forefinger, and work from you. Pointing the needle toward you, take a short running stitch directly on the line keeping the thread always on the right side of the needle, except on a line curving sharply to the left when the thread will fall more naturally to the left side. The thread being carried from one stitch to another gives the effect of a long diagonal stitch on the right side and running stitches on the wrong. The length of the stitch will be determined by the size of the thread, and the character of the line to be covered, a curved line requiring a shorter stitch than a straight one.
What changed for this modern edition
- This is a historical guided design exercise, not a fixed historical doily chart. The source reproduces eleven student designs and asks the maker to create, compare, and choose an outline.
- The source dimensions are a 9-inch cloth and 8-inch practice papers. Modern transfer methods are practical additions; test any marking method on a scrap first.
- The steps combine the doily exercise with the referenced blanket and Kensington stitch instructions from the same book. The modern guide has not been physically sample-stitched.
View the original source illustration
Public domain in the USA. Rights status can differ outside the United States.
View the digitized book at Project GutenbergThe copyright page gives 1910. The title page identifies McGlauflin as supervisor of girls’ handwork in the Denver Public Schools.
Maker notes
Your shelf
Sign in to save projects across devices and share your making.
Finished projects
No makers have shared a finished version yet.
Questions and notes
No comments yet. You can be the first to share a useful note.