Source illustrationAbout this image
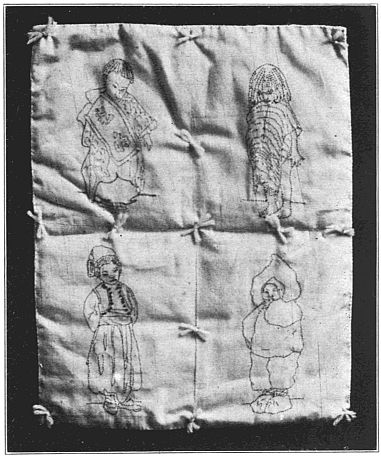
Source illustration associated with the doll’s quilt exercise. The modern instructions use new geometric or plain panels and do not reproduce a period motif.Historical pattern · Modern adaptation
Four-panel doll’s quilt
Join four small running-stitch panels, add a lining, turn the edges, and tack the layers together as the source describes.
Before you begin
Materials
- Four woven cotton panels, each 6 × 8 in before folding
- One piece of lining fabric cut to the measured joined top
- Sewing thread suitable for the fabric
- Hand-sewing needle, ruler, pins or clips, scissors, and iron
Quick reference
Abbreviations
- Running stitch
- Pass the needle in and out of the cloth at regular intervals.
- Overhand
- Join two folded edges with small stitches over the edges.
- Tack
- Make a small securing stitch through layers to hold them together.
One step at a time
Step-by-step instructions
- 1
Make four practice panels
Cut four woven panels, each 6 × 8 inches. The source describes these dimensions for running-stitch designs 1 through 4. Add your own simple geometric running-stitch lines or leave the panels plain; the source’s illustrated designs are not reproduced here.
- 2
Run the stitches
Mark a simple path on each panel and sew it with running stitch. Keep the rows even, secure the thread ends on the back, and press the panels flat.
- 3
Join the first two pairs
For panels 3 and 4, turn a ¼-inch fold only along the two long edges that will meet. Leave the other edges raw. Baste the folded edges together, then overhand them. Repeat with panels 1 and 2. Check that the two joined sections have the same shape.
- 4
Join the two pairs
Turn a ¼-inch fold only along the top edge of one joined section and the bottom edge of the other, where the sections will meet. Leave the outer edges raw. Baste the folded edges together and overhand them to make one four-panel top. Press it flat.
- 5
Cut and baste the lining
Measure the joined top before finishing its outer edges. Cut one lining piece to the same measured width and length. Place the layers with their wrong sides together so the right side of each is outward, align the raw edges, and baste around the perimeter.
- 6
Turn in and join the edges
Turn the raw edge of each layer under by ¼ inch all around. Baste the folds so the turned edges meet along the perimeter, then overhand them together. This is a modern, explicit version of the source’s direction to turn in and overhand the edges.
- 7
Tack the two layers
Mark a 3 × 3 grid on the quilt: one row at each quarter point and at the center of the length, crossed by the same three positions across the width. Make one small tack through both layers at each of the nine intersections. This grid is an editorial choice for the thin, two-layer version. The source says to tack but does not set spacing.
Modern adaptation. Check materials, measurements, and gauge before beginning.
Historical pattern · Modern adaptation
From Handicraft for Girls
Original heading: DOLL'S QUILT—ELECTIVE · Chapter II, running-stitch exercises and “Doll’s Quilt” elective, printed pp. 13–18
Read the original wording and adaptation notes
Original wording
Materials: Stamped running design No. 1, page 12. Unbleached muslin 6" × 8"; colored thread No. 50; needle No. 7. Make pupils perfectly familiar with the name and use of this stitch. See "Description of Stitches Used in Plain Sewing," page 63. The object of this model is to give the pupils practice in the running stitch. These designs are more interesting than practicing on plain cloth, so if the work is not satisfactory, cut the knot, pull out the thread, and try again. Give special attention to the knots and the fastening of the threads and the general neatness of the work. Place the knot on the wrong side and follow the lines of the design with the running stitch. Materials: Running design No. 2, page 12, 6" × 8"; colored thread No. 50; needle No. 7. Follow the lines of the design with the running stitch. Materials: Running design No. 3, page 12, 6" × 8"; colored thread No. 50; needle No. 7. Follow the lines of the design with the running stitch. Materials: Running design No. 4, page 12, 6" × 8"; colored thread No. 50; needle No. 7. Follow the lines of the design with the running stitch. Running designs 3 and 4 are to be overhanded together. Turn a quarter-inch fold on the long sides of both pieces. Baste the folded edges together and overhand. Running designs 1 and 2 are to be overhanded to 3 and 4. Turn a quarter-inch fold at the top of one piece and the bottom of the other, baste the folded edges together and overhand. The four running designs in Exercise No. 10 may be made into a doll's quilt by basting to a lining, turning in and overhanding the edges together and tacking. Pupils will furnish their own materials for the lining.
What changed for this modern edition
- The source directs the maker to overhand designs 3 and 4 along their adjoining long edges, join designs 1 and 2 the same way, then overhand the two pairs at their adjoining top and bottom edges. Only joining edges are folded during those joins; the outer edges stay raw until the lining is attached.
- The source says to baste the assembled top to a lining, turn in and overhand the perimeter, then tack. This edition cuts the lining to the joined top’s measured dimensions, places wrong sides together, turns each raw edge under ¼ inch, and overhands the meeting folds.
- The 3 × 3 tack grid is an editorial choice for the two-layer version. No batting is used because the source gives no batting or thickness instructions.
- Use a new geometric or plain panel treatment. The source includes period illustrations that are not copied into this adaptation.
- The modern instructions have not been physically sample-sewn.
View the original source illustration
Public domain in the USA. Rights status can differ outside the United States.
View the digitized book at Project GutenbergThe copyright page gives 1910. The title page identifies McGlauflin as supervisor of girls’ handwork in the Denver Public Schools.
Maker notes
Your shelf
Sign in to save projects across devices and share your making.
Finished projects
No makers have shared a finished version yet.
Questions and notes
No comments yet. You can be the first to share a useful note.