Source illustrationAbout this image
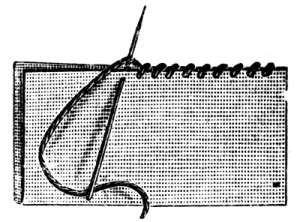
Figure 11 from Dillmont’s Encyclopedia of Needlework shows oversewing. McGlauflin gives the miniature pillowcase instructions but no dedicated project photograph.Historical pattern · Modern adaptation
A pair of miniature pillowcases
Two small pillowcases sewn by hand with a folded seam and a deep top hem.
Before you begin
Materials
- Two woven muslin pieces, each 7½ × 8½ in, with warp along the 7½ in length
- Sewing thread suitable for the cloth
- Hand-sewing needle
- Pins or clips, scissors, ruler, and iron
Quick reference
Abbreviations
- Backstitch
- Bring the needle up ahead, then take it back to the previous stitch endpoint before bringing it up farther along.
- Overhand
- Join two folded edges with small stitches that pass over both edges.
- Overcast
- Pass thread over a raw edge to reduce fraying.
One step at a time
Step-by-step instructions
- 1
Cut two pieces
Cut two pieces of woven muslin, each 7½ inches along the warp and 8½ inches along the woof. The source says the warp should run lengthwise along the pillow.
- 2
Fold the fabric
This edition uses a simple modern construction because the source does not clearly identify which edge remains open. With the 7½-inch warp direction running lengthwise, fold the 8½-inch woof dimension in half so the rectangle becomes 7½ × 4¼ inches, right sides together. The crease forms one long edge.
- 3
Sew the side and bottom
With the case still inside out, use small backstitches to sew the two aligned long cut edges together with a ¼-inch seam. Sew one short end closed with another ¼-inch seam. Leave the opposite short end open. These seams make the case functional and are a modern clarification of the source’s unclear assembly.
- 4
Finish the opening
At the open end, turn the raw edge toward the wrong side by ¼ inch, then turn it again by ¾ inch to make a ¾-inch-deep hem. Baste and sew the hem. The two folds use 1 inch of fabric in total while leaving a ¾-inch finished hem.
- 5
Finish the seams
Overcast the raw side and bottom seam allowances to reduce fraying, then turn the case right side out and press gently.
- 6
Make the second case
Repeat the same steps for the second piece. Compare both cases before pressing. The approximate finished size follows from the modern fold and ¼-inch seams, not from a finished measurement in the source.
Modern adaptation. Check materials, measurements, and gauge before beginning.
Historical pattern · Modern adaptation
From Handicraft for Girls
Original heading: A Pair of Miniature Pillow Cases · Chapter III, “A Pair of Miniature Pillow Cases,” Exercise No. 18, printed p. 26
Read the original wording and adaptation notes
Original wording
Materials: Two pieces bleached muslin 7½" warp, 8½" woof; white thread No. 50; needle No. 7. In a pillow case the warp threads should run lengthwise of the pillow. Crease a quarter-inch fold across one end and on both sides. Fold with the warp through the center so that the seam just turned comes on the inside, baste the folded edges together on the right side. Overhand on the right side, using no knot, but sewing over the end of the thread. Turn a three-quarter inch hem, baste and hem. Trim the seam and overcast.
What changed for this modern edition
- The source gives two miniature pieces and their warp/woof orientation but its folding sequence does not clearly state how the bottom is closed. This modern edition folds each piece across the woof width, uses backstitch to close one long side and one end, and leaves the other end open.
- The approximate finished size is calculated from the source cut dimensions, ¼-inch seams, and ¾-inch hem depth. It is an editorial result, not a source measurement.
- The source specifies overhanding on the right side. Backstitching, the closed bottom seam, and the two-turn hem are modern construction choices.
- Modern steps use current thread and needle choices. The historical thread and needle numbers are not modern size conversions.
- The modern instructions have not been physically sample-sewn.
View the original source illustration
Public domain in the USA. Rights status can differ outside the United States.
View the digitized book at Project GutenbergThe copyright page gives 1910. The title page identifies McGlauflin as supervisor of girls’ handwork in the Denver Public Schools.
Maker notes
Your shelf
Sign in to save projects across devices and share your making.
Finished projects
No makers have shared a finished version yet.
Questions and notes
No comments yet. You can be the first to share a useful note.