Source illustrationAbout this image
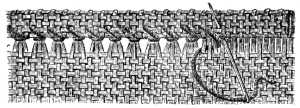
Source illustration, figure 55, showing the single hem-stitch structure.Historical guide · Modern adaptation
Single hem-stitch
Draw a small group of fabric threads and stitch the folded hem to the remaining cross threads.
Before you begin
Materials
- A firm-woven linen or cotton practice strip
- Matching sewing thread
- Sharp embroidery scissors
- Hand-sewing needle
- Ruler and a fine marking pencil
One step at a time
Step-by-step instructions
- 1
Make a practice hem
Cut a small fabric strip with a straight edge. Fold a narrow hem and press it. Test the fabric first: you need to be able to withdraw threads without tearing the weave.
- 2
Draw out two or four threads
Below the folded edge, carefully lift and cut two or four lengthwise threads. Pull them out one at a time to make a narrow open line. The source says the number depends on the coarseness of the fabric.
- 3
Tack the fold to the line
Fold the hem down to the drawn-thread line and baste it in place. Check that the edge follows the line evenly before adding permanent stitches.
- 4
Work from right to left
Start at the right end of the practice hem. Secure the sewing thread under the fold with two small backstitches just to the left of your starting point, then work from right to left. Pick up three or four cross threads in the open band, then insert the needle into the folded hem just above them, three or four threads from the hem edge. Draw the stitch snug without puckering.
- 5
Repeat and finish
Gather the next group of three or four cross threads and anchor it in the fold. Continue across the strip, checking that each group is even. The source also recommends this stitch to keep fringe threads from ravelling.
Modern adaptation. Check materials, measurements, and gauge before beginning.
Historical guide · Modern adaptation
From Encyclopedia of Needlework
Original heading: Single hem-stitch · “Single and cut Open-work,” fig. 55
Read the original wording and adaptation notes
Original wording
Single hem-stitch (fig. 55 ).—Draw out, according to the coarseness of the stuff, two or four threads, below the edge of the turning, and tack your hem down to the line thus drawn. Fasten your thread in to the left, and work your hem from right to left, taking up three or four cross-threads at a time, and inserting your needle, immediately above, into the folded hem, three or four threads from the edge, and then drawing it out. The same stitch is used for preventing the fringes, that serve as a finish to so many articles of house-linen, from ravelling.
What changed for this modern edition
- This is a technique guide with a modern practice strip. The source does not prescribe dimensions for a finished household item.
- The source says to fasten the thread “in to the left” and work right to left. This practice guide places the starting point at the right end and explains how to secure the thread under the fold.
- Use fabric and tools suited to the learner. The modern guide has not been physically sample-stitched.
View the original source illustration
Public domain in the USA. Rights status can differ outside the United States.
View the digitized book at Project GutenbergThis Project Gutenberg source identifies itself as an English edition but gives no publication year. No year is inferred here.
Maker notes
Your shelf
Sign in to save projects across devices and share your making.
Finished projects
No makers have shared a finished version yet.
Questions and notes
No comments yet. You can be the first to share a useful note.