Source illustrationAbout this image
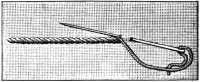
Source illustration, figure 173, for the sloping stem-stitch method. The instructions also cover straight stem stitch, figure 172.Historical guide · Modern adaptation
Straight and sloping stem stitch
Practice two line stitches from a historical embroidery guide, one worked over a foundation thread and one worked without it.
Before you begin
Materials
- Plain-woven cotton or linen practice cloth
- Embroidery floss or sewing cotton
- Embroidery needle
- Embroidery hoop if helpful
- Pencil or removable fabric marker
- Scissors
One step at a time
Step-by-step instructions
- 1
Draw two practice lines
Mark two short, gently curved lines on a fabric scrap. The source gives stitch methods rather than a finished motif, so these lines are a modern practice exercise.
- 2
Prepare the straight stem stitch
On the first line, sew a small running foundation line. Bring the needle up just below the foundation thread, then insert it just above and bring it out underneath the foundation thread. Work from left to right. For delicate cloth, take up only the small amount of fabric the foundation thread covers.
- 3
Keep the stitches even
Repeat along the line, placing the needle above the foundation thread and bringing it out below. Keep the thread tension steady so the line lies flat.
- 4
Try the sloping version
On the second line, omit the foundation thread. Insert the needle from right to left at a slant, passing under one or two horizontal fabric threads and five or six perpendicular threads, as the source describes. Each stitch reaches about halfway back to the previous one.
- 5
Compare the two lines
Look at the front and back. Notice how the foundation changes the straight version and how the sloping version follows the cloth threads. Secure the thread on the back. Add a monogram or floral shape only if you have a separate design to follow.
Modern adaptation. Check materials, measurements, and gauge before beginning.
Historical guide · Modern adaptation
From Encyclopedia of Needlework
Original heading: Straight stem stitch and Sloping stem stitch · “White Embroidery,” “Straight stem stitch” and “Sloping stem stitch,” figs. 172–173
Read the original wording and adaptation notes
Original wording
Straight stem stitch (fig. 172 ).—Work from left to right. The needle must always be inserted above the run thread, and brought out underneath it. In the case of a very delicate pattern, take up only just as much stuff as the run thread covers. Sloping stem stitch (fig. 173 ).—Work without a run thread; insert the needle from right to left in a slanting direction, under 1 or 2 horizontal threads, and 5 or 6 perpendicular ones; so that each stitch reaches halfway back to the last. This kind of stem stitch is chiefly used for the fine upstrokes of letters and numbers, and for linen embroidery.
What changed for this modern edition
- The source teaches the stitch methods but does not include a project-sized motif here. The modern marked lines are a practice exercise.
- The directions retain the source’s thread-count description for sloping stitches. On a different weave, use it as a guide and keep the stitch length consistent.
- The modern practice guide has not been physically sample-stitched.
View the original source illustration
Public domain in the USA. Rights status can differ outside the United States.
View the digitized book at Project GutenbergThis Project Gutenberg source identifies itself as an English edition but gives no publication year. No year is inferred here.
Maker notes
Your shelf
Sign in to save projects across devices and share your making.
Finished projects
No makers have shared a finished version yet.
Questions and notes
No comments yet. You can be the first to share a useful note.