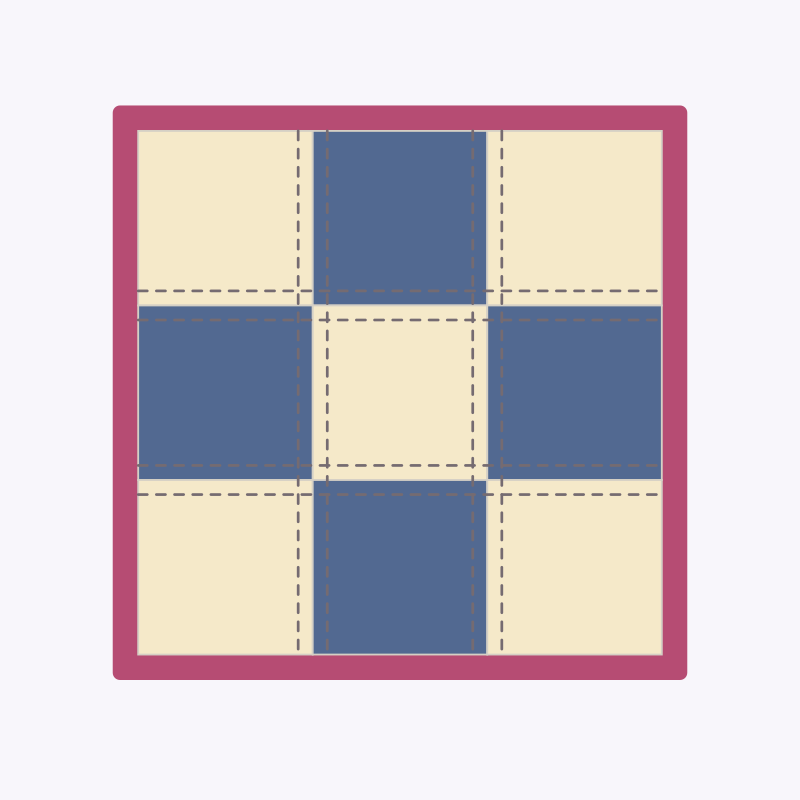
Pattern diagramAbout this image
Diagram drawn from this project’s written instructions. Use the instructions for measurements and construction. This is not a finished-project photograph.Quilting
Nine-patch mini quilt
Build a balanced nine-patch from light and dark squares, then add a quilted grid and a durable double-fold binding.
Before you begin
Materials
- Nine prewashed quilting-cotton squares, each 3 × 3 in (7.6 × 7.6 cm): five light and four dark
- Quilting-cotton backing, at least 10 × 10 in (25.4 × 25.4 cm)
- Low-loft batting, at least 10 × 10 in (25.4 × 25.4 cm)
- Quilting cotton for five 2½ × 11 in (6.4 × 27.9 cm) binding strips
- All-purpose sewing thread for piecing and binding
- Quilting thread for stitching the layers
- Hand-sewing needle, size 8 or 9
- Thimble
- Quilting ruler marked in inches
- Fabric scissors
- Washable fabric marker or fine pencil
- Iron and ironing surface
- Safety pins for basting
Quick reference
Abbreviations
- Right sides
- The printed or finished faces of the fabric. Place them together when joining pieces.
- Seam allowance
- The fabric between the cut edge and the stitching line. This project uses ¼ in (6 mm) for every patchwork seam.
- Quilt sandwich
- The quilt top, batting, and backing layered together before quilting.
- Baste
- Temporarily hold the three quilt layers together with pins before stitching them permanently.
- Double-fold binding
- A fabric strip folded in half, sewn over the raw quilt edge, and stitched down on the back.
- Backstitch
- A strong hand stitch: bring the needle up, take one short stitch forward, then send the needle back down at the end of the previous stitch. Bring it up one stitch-length ahead and repeat.
- Running stitch
- A hand stitch made by passing the needle in and out of the fabric at even intervals.
- Whipstitch
- A small hand stitch that passes over the folded binding edge and catches the quilt backing underneath.
One step at a time
Step-by-step instructions
- 1
Cut the squares
Wash and press the cotton. Cut nine 3 × 3 in (7.6 × 7.6 cm) squares: five light and four dark. Each square loses ½ in across its width when joined to a neighbor, leaving a 2½ in finished square. Three finished squares across make a 7½ in block.
Helpful hint · A consistent ¼ in seam matters more than the exact hand-stitch size.
- 2
Plan the nine-patch layout
Arrange three rows with light squares at all four corners and in the center. Put a dark square in each remaining position. Read the layout left to right: light, dark, light; dark, light, dark; light, dark, light. Photograph the layout before moving any pieces.
- 3
Piece each row
Sew the first and second squares of each row right sides together with a marked ¼ in seam. Add the third square to each pair. Knot the ends and press every row seam toward its dark square. In this layout, the allowances point toward each other on the first row and away from each other on the next, so seams can nest when you join the rows.
- 4
Join the rows
Place rows one and two right sides together. Match each cross seam and pin through the nested allowance. Sew the ¼ in seam. Attach row three the same way. Press the row seams in alternating directions. The block should measure 8 × 8 in before it is sewn into anything, because it still has ¼ in seam allowance on every outside edge.
Helpful hint · This is the top-edge size. The binding wraps around that edge, so the mini quilt stays about 8 in square when finished.
- 5
Prepare the binding strips
Cut five strips 2½ × 11 in (6.4 × 27.9 cm). To join two strips, place their short ends at right angles with right sides together so they overlap into a square. Mark a diagonal line from the inside corner to the opposite outside corner and sew along it. Open the strip to check the seam lies straight, trim the seam allowance to ¼ in, and press it open. Join the remaining strips the same way. Fold the long strip in half lengthwise, wrong sides together, and press.
- 6
Layer and baste
Place the 10 in backing wrong side up, spread the 10 in batting over it, then center the patchwork top right side up. Smooth the layers from the center outward. Pin about every 2 in (5 cm) with safety pins, away from the planned stitching lines.
- 7
Quilt a grid
Start with a small knot buried between the top and batting. From the center, use even running stitches through all three layers along both sides of each patchwork seam, about ¼ in (6 mm) away. Work toward the outside edge and remove pins as you reach them. At the end of each line, make two tiny backstitches. Pass the needle through the batting for about 1 in (2.5 cm), bring it out, and clip the thread close to hide the tail. Follow the batting label for maximum spacing. Trim the backing and batting even with the 8 in top.
- 8
Attach and finish the binding
Leave a 6 in tail, then sew the binding raw edge to the front with a ¼ in seam. At each corner, stop ¼ in from the edge, stitch off at a 45° angle, fold the strip up and away to make a diagonal crease, then fold it back down and continue along the next side. Stop with a 6 in gap near the start. Lay the two loose tails flat over the gap and trim them so they overlap by 2½ in. Open the folded tails and place them right sides together at right angles, overlapping them into a square. Mark a diagonal from the inside corner to the opposite outside corner and sew along it. Open the join and check that the binding fits flat around the quilt; if it twists or pulls, unpick and adjust before trimming. Trim the seam to ¼ in and press it open. Refold the binding, sew the gap closed, then fold the strip over the raw edge to the back and hand-stitch the folded edge down with small whipstitches that catch the backing.
Original starter instructions, not test sewn. The diagram shows this pattern’s patch layout and quilting plan. Finished size and time are approximate; check your seam allowance as you go.
Maker notes
Your shelf
Sign in to save projects across devices and share your making.
Finished projects
No makers have shared a finished version yet.
Questions and notes
No comments yet. You can be the first to share a useful note.